Create Wind Sail B09PLL7S78 Handleiding
Inhoudsopgave
Beschikbare talen
Beschikbare talen
Quick Links
Inhoudsopgave

Gerelateerde Handleidingen voor Create Wind Sail B09PLL7S78


Samenvatting van Inhoud voor Create Wind Sail B09PLL7S78
- Pagina 1 Wind Sail User manual | Manual de instrucciones...
-
Pagina 4: Inhoudsopgave
I ND E X ENGLISH ESPAÑOL Location and installation requirements Requisitos de ubicación e instalación Mechanic tips Consejos mecánicos Electrical Tips Consejos eléctricos Security instructions Instrucciones de seguridad Parts list Lista de piezas Remote control Mando a distancia Installation instructions Instrucciones de instalación Installation Preparation Preparación de la instalación... - Pagina 5 IN DE X ITALIANO DEUTSCH Requisiti di posizione e installazione Standort- und Installationsanforderungen Consigli del meccanico Tipps für Mechaniker Suggerimenti elettrici Elektrische Tipps Istruzioni di sicurezza Sicherheitshinweise Elenco delle parti Liste der Einzelteile Telecomando Fernbedienung Istruzioni per l'installazione Installationsanleitung Preparazione dell'installazione Installationsvorbereitung Installazione della staffa di montaggio Montage der Montagehalterung...
-
Pagina 6: English
E N G L I S H Thank you for choosing our ceiling fan. Before using this appliance and to ensure its best use, please read the instructions carefully. The safety measures listed here reduce the risk of fire, electric shock, and injury when followed correctly. -
Pagina 7: Security Instructions
SECURITY INSTRUCTIONS When using any electrical appliance, the following basic safety precau- tions should always be observed. Please read this manual carefully before beginning installation. • To reduce the risk of personal injury, attach the fan directly to the build- •... -
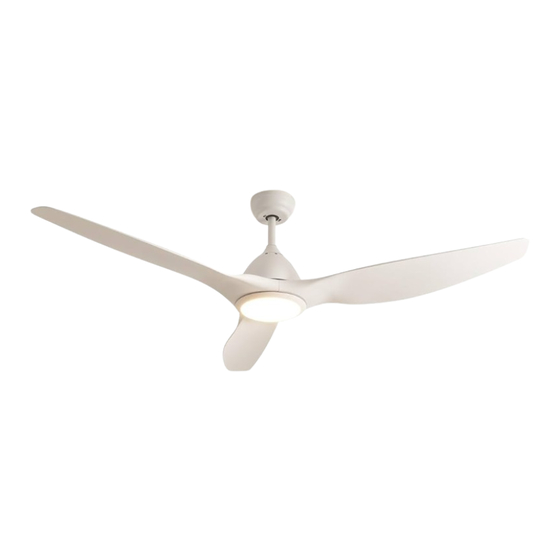
Pagina 8: Parts List
PARTS LIST • Carefully open the packaging and remove the parts included inside. • Place them on the floor on a rug or a piece of plastic large enough to prevent any damage. • Check that the objects listed below are inside the packaging. Engine Floron Mounting bracket... -
Pagina 9: Remote Control
REMOTE CONTROL 1. Speed control 2. ** Light control button 3. Turn off Botton 4. Power indicator 5. Timer 6. Battery for remote control ** Function only for the option with light Warnings 1. Please use this product under the correct tension. Too low voltage will result in failed op- eration. -
Pagina 10: Installing The Mounting Bracket
I NSTAL LI NG TH E M OUNTI NG B R ACKE T • Check that the ceiling where you intend to mount the fan is stable and capable of safely supporting the weight of the fan. • Do not fix the mounting bracket directly on ceilings less than 10mm to avoid the risk of the screw loosening and coming out. -
Pagina 11: Suspension Bar Installation
S U SP E NSI ON BAR INSTALL ATIO N • If you want to extend the hanging length of your fan, remove the ball from the hanger rod and use the additional extension rod (included). • If you want to use the extension bar, follow the following instructions:. 1. -
Pagina 12: Wiring Connection
W IRI NG CO NNECTIO N • Connect the appropriate wires from the controller to your fan and then connect the wires from the controller to your ceiling connections. • Don’t forget to connect the ceiling earth wire to the fan. •... -
Pagina 13: Blade Installation
B L ADE I NSTALL ATI ON 1. Place the blade support and screw each blade one by one until they are completely se- cured. Do not overtighten the screws. 2. Then align with the blade support and the assembled blades, fit the support to the fan motor, lining up the holes to be able to screw them. -
Pagina 14: Light Assembly
LI G HT AS SE M B LY *Only for the model WITH LIGHT • Connect the single pin sockets on the breakout board to those on the LED panel. The LED panel is magnetized so it attaches to the connection board by simply putting both pieces together. -
Pagina 15: Requisitos De Ubicación E Instalación
E S PA Ñ O L Gracias por elegir nuestro ventilador de techo. Antes de utilizar este electrodoméstico y para asegurar su mejor uso, por favor, lea detenidamente las instrucciones. Las medidas de seguridad aquí indicadas reducen el riesgo de incendio, descarga eléctrica y lesiones cuando se siguen correctamente. -
Pagina 16: Instrucciones De Seguridad
INSTRUCCIONES DE SEGURIDAD Al utilizar cualquier aparato eléctrico, deben observarse siempre las si- guientes precauciones básicas de seguridad. Lea este manual con detenimiento antes de empezar la instalación. • Para reducir el riesgo de sufrir cualquier daño personal, acople el ven- •... -
Pagina 17: Lista De Piezas
LISTA DE PIEZAS • Abra con cuidado el embalaje y retire las piezas que se incluyen en su interior. • Colóquelas en el suelo sobre una alfombra o un trozo de plástico lo suficientemente grande para evitar cualquier daño. • Compruebe que los objetos que se detallan a continuación se encuentran en el interior del embalaje. -
Pagina 18: Mando A Distancia
MANDO A DISTANCIA 1. Control de velocidad 2. ** Botón de control de la luz 3. Botón de apagado 4. Indicador de encendido 5. Temporizador 6. Pila para el mando ** Función solo para la opción con luz Advertencias 1. Utilice este producto bajo la tensión correcta. Un voltaje demasiado bajo resultará en una operación fallida. -
Pagina 19: Instalación Del Soporte De Montaje
INSTAL ACI ÓN DE L SO P O RTE DE M ONTA J E • Compruebe que el techo donde desea montar el ventilador es estable y capaz de soportar con seguridad el peso del ventilador. • No fije el soporte de montaje directamente en techos de menos de 10 mm para evitar el riesgo de que el tornillo se afloje y se salga. -
Pagina 20: Instalación De La Barra De Suspensión
INSTAL ACI ÓN DE L A BARR A DE SUSPE NSI Ó N • Si quiere extender la longitud de cuelgue de su ventilador, retire la bola de la barra de suspensión y utilice la barra adicional de extensión (incluida). •... -
Pagina 21: Conexión Del Cableado
CO NE XI ÓN DE L CAB LEADO • Conecte los cables correspondientes del controlador a su ventilador y posteriormente co- necte los cables del controlador a las conexiones de su techo. • No olvide conectar el cable de toma de tierra del techo al ventilador. •... -
Pagina 22: Instalación De Las Aspas
INSTALACIÓN DE LAS ASPAS 1. Coloque el soporte de las aspas y atornille una a una cada aspa hasta que queden total- mente sujetas. No apriete los tornillos demasiado. 2. Después alinee con el soporte de las aspas y las aspas montadas encaje el soporte al motor del ventilador alineando los agujeros para poder atornillarlos. -
Pagina 23: Montaje De La Luz
M O NTA J E DE L A LU Z *Solo para el modelo CON LUZ • Conecte los enchufes de clavija única de la placa de conexiones con los del panel LED. El panel LED está magnetizado así que se acopla a la placa de conexiones simplemente juntando ambas piezas. -
Pagina 24: Português
PO RT U GU Ê S Obrigado por escolher nosso ventilador de teto. Antes de utilizar este aparelho e para garan- tir a sua melhor utilização, leia atentamente as instruções. As medidas de segurança listadas aqui reduzem o risco de incêndio, choque elétrico e ferimentos quando seguidas corretamente. -
Pagina 25: Instruções De Segurança
INSTRUÇÕES DE SEGURANÇA Ao usar qualquer aparelho elétrico, as seguintes precauções básicas de segurança devem ser sempre observadas. Leia este manual com atenção antes de iniciar a instalação. • Para reduzir o risco de ferimentos pessoais, fixe o ventilador diretamente •... -
Pagina 26: Lista De Peças
LISTA DE PEÇAS • Abra a embalagem com cuidado e retire as peças incluídas no interior. • Coloque-os no chão sobre um tapete ou pedaço de plástico grande o suficiente para evitar danos. • Verifique se os objetos listados abaixo estão dentro da embalagem. Motor Suporte de montagem Barra de... -
Pagina 27: Controle Remoto
CONTROLE REMOTO 1. Controle de velocidade 2. ** Botão de controle de luz 3. Desligue o botão 4. Indicador de energia 5. Cronômetro 6. Bateria para controle remoto **Função somente para a opção com luz Avisos 1. Use este produto sob a tensão correta. Tensão muito baixa resultará em falha na operação. 2. -
Pagina 28: Instalando O Suporte De Montagem
I NSTAL ANDO O SU P O RTE DE M ONTAGE M • Verifique se o teto onde pretende montar o ventilador é estável e capaz de suportar com segurança o peso do ventilador. • Não fixe o suporte de montagem diretamente em tetos com menos de 10 mm para evitar o risco de o parafuso se soltar e sair. -
Pagina 29: Instalação De Barra De Suspensão
INSTAL AÇÃO DE BARR A DE SUSPE NSÃO • Se você quiser estender o comprimento de suspensão do seu ventilador, remova a bola da haste de suspensão e use a haste de extensão adicional (incluída). • Se você quiser usar a barra de extensão, siga as seguintes instruções:. 1. -
Pagina 30: Conexão De Fiação
CO NE X ÃO DE FI AÇÃO • Ligue os fios apropriados do controlador à sua ventoinha e, em seguida, ligue os fios do controlador às ligações do teto. • Não se esqueça de ligar o fio de terra do teto à ventoinha. •... -
Pagina 31: Instalação Da Lâmina
I NSTAL AÇÃO DA L ÂM I NA 1. Coloque o suporte da lâmina e aparafuse cada lâmina uma a uma até ficarem completa- mente fixadas. Não aperte demasiado os parafusos. 2. Em seguida alinhe com o suporte das pás e as pás montadas, encaixe o suporte no motor do ventilador, alinhando os furos para poder parafusá-los. -
Pagina 32: Montagem De Luz
MO NTAG E M DE LU Z *Somente para o modelo COM LUZ • Conecte os soquetes de pino único na placa de distribuição aos do painel de LED. O painel de LED é magnetizado para ser fixado à placa de conexão simplesmente juntando as duas peças. -
Pagina 33: Français
F R A NÇ AIS Merci d'avoir choisi notre ventilateur de plafond. Avant d'utiliser cet appareil et pour garantir sa meilleure utilisation, veuillez lire attentivement la notice. Les mesures de sécurité répertoriées ici réduisent le risque d’incendie, de choc électrique et de blessure lorsqu’elles sont correctement suivies. -
Pagina 34: Consignes De Sécurité
CONSIGNES DE SÉCURITÉ Lors de l’utilisation d’un appareil électrique, les précautions de sécurité de base suivantes doivent toujours être respectées. Veuillez lire attentivement ce manuel avant de commencer l'installation. • Pour réduire le risque de blessures, fixez le ventilateur directement à la •... -
Pagina 35: Liste Des Pieces
LISTE DES PIECES • Ouvrez soigneusement l'emballage et retirez les pièces incluses à l'intérieur. • Placez-les au sol sur un tapis ou un morceau de plastique suffisamment grand pour éviter tout dommage. • Vérifiez que les objets listés ci-dessous se trouvent à l'intérieur de l'emballage. Moteur Support de montage Bar de... -
Pagina 36: Télécommande
TÉLÉCOMMANDE 1. Contrôle de vitesse 2. ** Bouton de contrôle de la lumière 3. Désactiver le bouton 4. Indicateur d'alimentation 5. Minuteur 6. Batterie pour télécommande ** Fonction uniquement pour l'option avec lumière Avertissements 1. Veuillez utiliser ce produit sous la bonne tension. Une tension trop basse entraînera un échec de fonctionnement. -
Pagina 37: Installation Du Support De Montage
I NSTAL L ATIO N DU SUPP O RT DE M O NTAGE • Vérifiez que le plafond sur lequel vous comptez monter le ventilateur est stable et capable de supporter en toute sécurité le poids du ventilateur. • Ne fixez pas le support de montage directement sur des plafonds de moins de 10 mm pour éviter tout risque de desserrage et de sortie de la vis. -
Pagina 38: Pose De Barre De Suspension
P OSE DE BARRE DE SUSPE NSI O N • Si vous souhaitez étendre la longueur de suspension de votre ventilateur, retirez la boule de la tige de suspension et utilisez la tige d'extension supplémentaire (incluse). • Si vous souhaitez utiliser la barre d'extension, suivez les instructions suivantes :. 1. -
Pagina 39: Connexion Du Câblage
CO NNE X IO N DU CÂB L AGE • Connectez les fils appropriés du contrôleur à votre ventilateur, puis connectez les fils du contrôleur aux connexions de votre plafond. • N’oubliez pas de connecter le fil de terre du plafond au ventilateur. •... -
Pagina 40: Installation De La Lame
I NSTAL L ATI O N DE L A L AM E 1. Placez le support de lame et vissez chaque lame une à une jusqu'à ce qu'elles soient com- plètement fixées. Ne serrez pas trop les vis. 2. Alignez ensuite avec le support de pales et les pales assemblées, montez le support sur le moteur du ventilateur en alignant les trous pour pouvoir les visser. -
Pagina 41: Ensemble Léger
E NSE M B L E L ÉGE R *Uniquement pour le modèle AVEC LUMIERE • Connectez les prises à broche unique de la carte de dérivation à celles du panneau LED. Le panneau LED est magnétisé et se fixe donc à la carte de connexion en assemblant simple- ment les deux pièces. -
Pagina 42: Italiano
I TA L I A NO Grazie per aver scelto il nostro ventilatore da soffitto. Prima di utilizzare questo apparecchio e per garantirne il miglior utilizzo, leggere attentamente le istruzioni. Le misure di sicurezza qui elencate riducono il rischio di incendio, scosse elettriche e lesioni se seguite correttamente. -
Pagina 43: Istruzioni Di Sicurezza
ISTRUZIONI DI SICUREZZA Quando si utilizza qualsiasi apparecchio elettrico, è necessario osservare sempre le seguenti precauzioni di sicurezza di base. Si prega di leggere attentamente questo manuale prima di iniziare l'in- • stallazione. Per ridurre il rischio di lesioni personali, fissare il ventilatore direttamen- •... -
Pagina 44: Elenco Delle Parti
ELENCO DELLE PARTI • Aprire con attenzione la confezione ed estrarre le parti contenute all'interno. • Posizionateli sul pavimento su un tappeto o su un pezzo di plastica abbastanza grande da evitare danni. • Verificare che all'interno dell'imballo siano presenti gli oggetti sotto elencati. Staffa di fissaggio Motore Sbarra... -
Pagina 45: Telecomando
TELECOMANDO 1. Controllo della velocità 2. **Pulsante di controllo della luce 3. Disattiva Bottone 4. Indicatore di energia 5. Timer 6. Batteria per telecomando ** Funziona solo per l'opzione con luce Avvertenze 1. Si prega di utilizzare questo prodotto con la tensione corretta. Una tensione troppo bassa comporterà... -
Pagina 46: Installazione Della Staffa Di Montaggio
INSTAL L A Z I ONE DE LL A STAF FA DI MO NTAGG I O • Verificare che il soffitto dove si intende montare il ventilatore sia stabile e capace di soste- nere in sicurezza il peso del ventilatore. •... -
Pagina 47: Installazione Della Barra Di Sospensione
INSTAL L A ZI O NE DE LL A BARR A DI SOSPE NSI ONE • Se desideri estendere la lunghezza di sospensione del tuo ventilatore, rimuovi la sfera dall'asta di sospensione e utilizza l'asta di prolunga aggiuntiva (inclusa). • Se desideri utilizzare la barra di estensione, segui le seguenti istruzioni:. 1. -
Pagina 48: Collegamento Elettrico
CO L LEG AME NTO E LE T TRI CO • Collegare i fili appropriati dal programmatore al ventilatore e poi collegare i fili dal pro- grammatore alle connessioni del soffitto. • Non dimenticare di collegare il filo di terra del soffitto al ventilatore. •... -
Pagina 49: Installazione Della Lama
INSTAL L A Z I ONE DE L L A L AM A 1. Posizionare il supporto della lama e avvitare ciascuna lama una per una fino al completo fissaggio. Non stringere eccessivamente le viti. 2. Successivamente allineare il supporto pale e le pale assemblate, montare il supporto sul motore del ventilatore, allineando i fori per poterli avvitare. -
Pagina 50: Assemblaggio Leggero
AS SE M B L AG G I O L EGGE RO *Solo per il modello CON LUCE • Collegare le prese a pin singolo sulla breakout board a quelle sul pannello LED. Il pannello LED è magnetizzato quindi si collega alla scheda di connessione semplicemente mettendo insieme entrambi i pezzi. -
Pagina 51: Standort- Und Installationsanforderungen
D E U TS C H Vielen Dank, dass Sie sich für unseren Deckenventilator entschieden haben. Bevor Sie die- ses Gerät verwenden und um eine optimale Nutzung zu gewährleisten, lesen Sie bitte die Anweisungen sorgfältig durch. Die hier aufgeführten Sicherheitsmaßnahmen verringern bei korrekter Befolgung das Risiko von Bränden, Stromschlägen und Verletzungen. -
Pagina 52: Sicherheitshinweise
SICHERHEITSHINWEISE Bei der Verwendung von Elektrogeräten sollten stets die folgenden grund- legenden Sicherheitsvorkehrungen beachtet werden. Bitte lesen Sie dieses Handbuch sorgfältig durch, bevor Sie mit der Ins- • tallation beginnen. Um das Verletzungsrisiko zu verringern, befestigen Sie den Ventilator • gemäß... -
Pagina 53: Liste Der Einzelteile
LISTE DER EINZELTEILE • Öffnen Sie vorsichtig die Verpackung und entnehmen Sie die darin enthaltenen Teile. • Legen Sie sie auf den Boden, auf einen Teppich oder ein Stück Plastik, das groß genug ist, um Schäden zu vermeiden. • Überprüfen Sie, ob sich die unten aufgeführten Gegenstände in der Verpackung befinden. Motor Montagehalterung Ein Riegel... -
Pagina 54: Fernbedienung
FERNBEDIENUNG 1. Geschwindigkeitskontrolle 2. ** Lichtsteuertaste 3. Schalten Sie den Knopf aus 4. Kraftmesser 5. Timer 6. Batterie für Fernbedienung ** Funktion nur bei Option mit Licht Warnungen 1. Bitte verwenden Sie dieses Produkt unter der richtigen Spannung. Eine zu niedrige Span- nung führt zu einem fehlerhaften Betrieb. -
Pagina 55: Montage Der Montagehalterung
MO NTAG E DE R MO NTAG E H ALTE RUNG • Stellen Sie sicher, dass die Decke, an der Sie den Ventilator montieren möchten, stabil ist und das Gewicht des Ventilators sicher tragen kann. • Befestigen Sie die Montagehalterung nicht direkt an Decken mit einer Dicke von weniger als 10 mm, um das Risiko zu vermeiden, dass sich die Schraube löst und herauskommt. -
Pagina 56: Installation Der Aufhängestange
INSTAL L ATI ON DE R AUF H ÄNGE STANGE • Wenn Sie die Aufhängelänge Ihres Ventilators verlängern möchten, entfernen Sie die Kugel von der Aufhängestange und verwenden Sie die zusätzliche Verlängerungsstange (im Lieferumfang enthalten). • Wenn Sie die Erweiterungsleiste verwenden möchten, befolgen Sie die folgenden Anweisungen:. -
Pagina 57: Kabelverbindung
K AB E LV E RB I NDUNG • Schließen Sie die entsprechenden Drähte vom Steuergerät an den Ventilator und dann die Drähte vom Steuergerät an die Deckenanschlüsse an. • Vergessen Sie nicht, den Erdungsdraht der Decke an den Ventilator anzuschließen. •... -
Pagina 58: Klingeninstallation
KLI NG E NI NSTAL L ATI O N 1. Platzieren Sie die Klingenhalterung und schrauben Sie jede Klinge einzeln fest, bis sie vollständig befestigt ist. Ziehen Sie die Schrauben nicht zu fest an. 2. Richten Sie dann die Flügelhalterung und die zusammengebauten Flügel aus, montieren Sie die Halterung am Lüftermotor und richten Sie die Löcher aus, um sie festschrauben zu können. -
Pagina 59: Lichtmontage
LI CH TM O NTAG E *Nur für das Modell MIT LICHT • Verbinden Sie die einzelnen Pin-Buchsen auf der Breakout-Platine mit denen auf dem LED-Panel. Das LED-Panel ist magnetisiert, sodass es durch einfaches Zusammenstecken beider Teile an der Anschlussplatine befestigt werden kann. Notiz: Achten Sie beim Installieren oder Entfernen der LED-Platine darauf, die Isolierlaschen nicht zu berühren. -
Pagina 60: Nederlands
N E D E R L A N DS Bedankt dat u voor onze plafondventilator hebt gekozen. Lees de instructies zorgvuldig door voordat u dit apparaat gebruikt en om een optimaal gebruik ervan te garanderen. De hier genoemde veiligheidsmaatregelen verminderen het risico op brand, elektrische schokken en letsel als ze correct worden opgevolgd. -
Pagina 61: Beveiligingsinstructies
BEVEILIGINGSINSTRUCTIES Wanneer u een elektrisch apparaat gebruikt, moeten altijd de volgende fundamentele veiligheidsmaatregelen in acht worden genomen. Lees deze handleiding zorgvuldig door voordat u met de installatie begint. • Om het risico op persoonlijk letsel te verminderen, bevestigt u de venti- •... -
Pagina 62: Onderdelen Lijst
ONDERDELEN LIJST • Open voorzichtig de verpakking en verwijder de meegeleverde onderdelen. • Plaats ze op de vloer op een kleed of een stuk plastic dat groot genoeg is om schade te voorkomen. • Controleer of de onderstaande voorwerpen zich in de verpakking bevinden. Motor Montagebeugel Reep... -
Pagina 63: Afstandsbediening
AFSTANDSBEDIENING 1. Snelheidscontrole 2. ** Lichtbedieningsknop 3. Schakel Botton uit 4. Stroomindicator 5. Timer 6. Batterij voor afstandsbediening ** Functie alleen voor de optie met licht Waarschuwingen 1. Gebruik dit product onder de juiste spanning. Een te lage spanning zal resulteren in een mislukte werking. -
Pagina 64: Het Installeren Van De Montagebeugel
H E T I NSTALL E RE N VAN DE MO NTAGE B E UG E L • Controleer of het plafond waar u de ventilator wilt monteren stabiel is en het gewicht van de ventilator veilig kan dragen. • Bevestig de montagebeugel niet rechtstreeks op plafonds van minder dan 10 mm om te voorkomen dat de schroef losraakt en eruit komt. -
Pagina 65: Installatie Van Ophangstang
INSTAL L ATI E VAN OP H ANGSTANG • Als je de ophanglengte van je ventilator wilt vergroten, verwijder dan de bal van de ophangstang en gebruik de extra verlengstang (meegeleverd). • Als u het verlengstuk wilt gebruiken, volgt u de volgende instructies: 1. -
Pagina 66: Bedrading Aansluiting
B E DR ADI NG A ANSLUITI NG • Sluit de juiste draden van de controller aan op je ventilator en sluit vervolgens de draden van de controller aan op je plafondaansluitingen. • Vergeet niet om de aardedraad van het plafond aan te sluiten op de ventilator. •... -
Pagina 67: Installatie Van Het Mes
I NSTAL L ATI E VAN H E T M E S 1. Plaats de messteun en schroef elk mes één voor één vast totdat ze volledig vastzitten. Draai de schroeven niet te vast. 2. Lijn vervolgens uit met de bladsteun en de gemonteerde bladen, monteer de steun op de ventilatormotor en lijn de gaten uit om ze te kunnen vastschroeven. -
Pagina 68: Lichte Montage
LI CH TE M ONTAG E *Alleen voor het model MET LICHT • Sluit de enkelpolige aansluitingen op het breakout-bord aan op die op het LED-paneel. Het LED-paneel is gemagnetiseerd, zodat het aan het aansluitbord kan worden bevestigd door simpelweg beide delen in elkaar te zetten. Opmerking: Zorg ervoor dat u tijdens het installeren of verwijderen van de LED-kaart de iso- latielipjes niet aanraakt. -
Pagina 69: Polski
PO LS K I Dziękujemy za wybranie naszego wentylatora sufitowego. Przed użyciem tego urządzenia i aby zapewnić jego najlepsze wykorzystanie, prosimy o uważne przeczytanie instrukcji. Wymienione tutaj środki bezpieczeństwa zmniejszają ryzyko pożaru, porażenia prądem elektrycznym i obrażeń, jeśli są przestrzegane. Prosimy zachować instrukcję w bezpiecznym miejscu do wykorzystania w przyszłości, a także dowód sprzedaży i pudełko. -
Pagina 70: Instrukcje Bezpieczeństwa
INSTRUKCJE BEZPIECZEŃSTWA Podczas korzystania z dowolnego urządzenia elektrycznego należy zawsze przestrzegać poniższych podstawowych środków ostrożności. Przed rozpoczęciem instalacji prosimy o dokładne zapoznanie się z • niniejszą instrukcją. Aby zmniejszyć ryzyko obrażeń ciała, należy przymocować wenty- • lator bezpośrednio do konstrukcji wsporczej budynku, postępując zgodnie z poniższymi instrukcjami i używać... -
Pagina 71: Lista Części
LISTA CZĘŚCI • Ostrożnie otwórz opakowanie i wyjmij zawarte w nim części. • Połóż je na podłodze na dywaniku lub kawałku plastiku wystarczająco dużym, aby zapobiec uszkodzeniom. • Sprawdź, czy wymienione poniżej przedmioty znajdują się w opakowaniu. Uchwyt montażowy Silnik Pasek Floron rozszerzenie... -
Pagina 72: Pilot
PILOT 1. Kontrola prędkości 2. ** Przycisk sterowania oświetleniem 3. Wyłącz Buttona 4. Wskaźnik mocy 5. Regulator czasowy 6. Bateria do pilota ** Funkcja tylko dla opcji ze światłem Ostrzeżenia 1. Proszę używać tego produktu pod odpowiednim napięciem. Zbyt niskie napięcie spowodu- je nieprawidłowe działanie. -
Pagina 73: Montaż Wspornika Montażowego
MO NTA Ż WSP O RNI K A M O NTA ŻOWEGO • Sprawdź, czy sufit, w którym zamierzasz zamontować wentylator, jest stabilny i jest w sta- nie bezpiecznie utrzymać ciężar wentylatora. • Nie mocuj wspornika montażowego bezpośrednio do sufitów w odległości mniejszej niż 10 mm, aby uniknąć... -
Pagina 74: Montaż Drążka Zawieszenia
MO NTA Ż DR Ą ŻK A Z AWIE SZE NIA • Jeśli chcesz wydłużyć długość zawieszenia swojego wentylatora, wyjmij kulkę z drążka wieszaka i użyj dodatkowego przedłużacza (w zestawie). • Jeśli chcesz skorzystać z paska rozszerzenia postępuj zgodnie z poniższą instrukcją:. 1. -
Pagina 75: Połączenie Okablowania
P O Ł ĄCZ E NI E OK AB LOWANIA • Podłącz odpowiednie przewody ze sterownika do wentylatora, a następnie podłącz pr- zewody ze sterownika do połączeń sufitowych. • Nie zapomnij podłączyć przewodu uziemienia sufitowego do wentylatora. • Podłącz okablowanie wentylatora zgodnie z poniższym schematem: *Tylko dla modelu BEZ ŚWIATŁA DACH Uziemienie (żółty/zielony) -
Pagina 76: Instalacja Ostrza
I NSTAL ACJA OSTRZ A 1. Umieść wspornik ostrza i przykręć każde ostrze jedno po drugim, aż zostaną całkowicie zabezpieczone. Nie dokręcaj śrub zbyt mocno. 2. Następnie wyrównaj ze wspornikiem ostrzy i zmontowanymi ostrzami, dopasuj wspornik do silnika wentylatora, wyrównując otwory tak, aby można było je przykręcić. 3. -
Pagina 77: Lekki Montaż
LE KKI M ONTA Ż *Tylko dla modelu Z OŚWIETLENIEM • Połącz pojedyncze gniazda pinowe na płytce zaciskowej z gniazdami na panelu LED. Panel LED jest namagnesowany, dzięki czemu można go przymocować do płytki przyłączeniowej, po prostu łącząc obie części. Notatka: Podczas instalowania lub wyjmowania tablicy LED należy uważać, aby nie dot- knąć... - Pagina 80 Made in P.R.C.